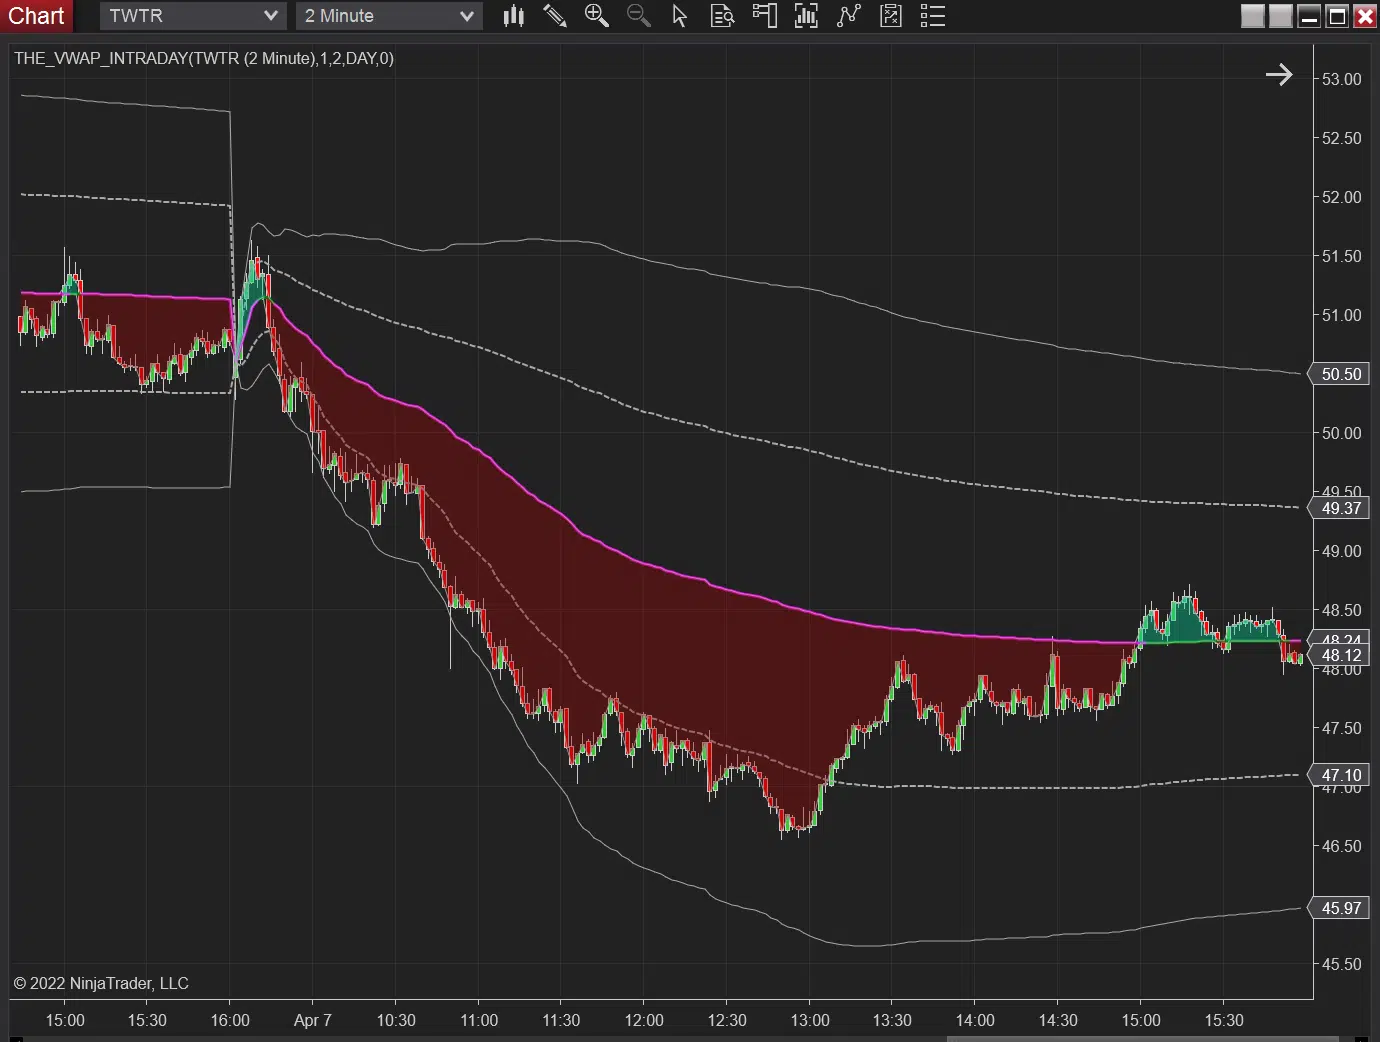
Intraday for Ninjatrader 8

NinjaTrader logo

Download the indicator and read through the tutorial provided below.

Indicator Tutorial

Click on the options below to read more about Intraday’s settings on NT8.

Import Instructions

Your download will appear as a zip folder, which you should not attempt to extract. The folder needs to be imported as-is in order to avoid errors.

If necessary, you can click here to find step-by-step import instructions for the indicator.

StDev 1 & St Dev2

Set to 1 and 2 by default, these inputs control the values of the plotted standard deviation bands on either side of VWAP. If both are set to 0, no deviation bands will be displayed.

TimeFrame

Select your desired timeframe for the plotted VWAP. Here are the available options:

DAY (default) — The option you’ll likely use most frequently. A standard intraday VWAP that resets at the beginning of each new trading session.

WEEK — Plots week-to-date VWAPs, using the first trading day of each week (or the leftmost point on the visible chart) as an anchor point.

MONTH — Plots month-to-date VWAPs, using the first trading day of each month (or the leftmost point on the visible chart) as an anchor point.

VWAP Color

Change the display color for the plotted VWAP. Here are the available option:

SlopeBasic (default) — The color of VWAP will change dynamically based on the current slope of VWAP — one color for when ascending and one for when descending.

SlopeSignal — Similar to SlopeBasic, but a third color is added for periods of “neutral” slope.

Single — The color of VWAP will remain consistent regardless of the current slope value.

VWAP Ascending

If VWAP Color is set to SlopeBasic or SlopeSignal, this option controls the color of VWAP during periods of positive slope.

VWAP Descending

If VWAP Color is set to SlopeBasic or SlopeSignal, this option controls the color of VWAP during periods of negative slope.

VWAP Single Color

If VWAP Color is set to Single, this option controls the color of VWAP.

Show Dev Signal

This checkbox corresponds to a calculate slope value threshold and will highlight certain periods with coloring of the +/- 2 deviation bands. We discuss its use in VWAP On-Demand.

Deviation Signal Color

If Show Dev Signal is checked, this option controls the color of its display.

Background Color Signal

This setting controls the visual display of the clouds above/below VWAP. Here are the available options:

Cloud (default) — Displays two different cloud colors — above VWAP and below VWAP.

Fast Lane — Displays clouds only in the space between the +/-1 and +/-2 deviation bands.

Both — Combines the two options above, displaying four different colors.

None — Turns off all cloud displays.

Tolerance Band Width

Plots additional bands surrounding the +/-1 deviation bands at a user-determined distance (expressed in deviations). We discuss their use in VWAP On-Demand.

Cloud Color Opacity

If clouds are enabled using Background Color Signal, this input controls the opacity of their display. The closer to 0 you set it, the less visible the clouds will appear.

Above VWAP

If clouds are enabled, this options control the display color above VWAP.

Below VWAP

If clouds are enabled, this options control the display color below VWAP.

Fast Lane Pos

If Background Color Signal is set to “Fast Lane” or “Both”, this options control the display color of the clouds between the +1 and +2 deviation bands.

Fast Lane Neg

If Background Color Signal is set to “Fast Lane” or “Both”, this options control the display color of the clouds between the -1 and -2 deviation bands.

High or Low of X Bars

Use of this option is discussed in VWAP On-Demand, and can/should be left set to 0 if not familiar with its purpose.

Futures Session

This checkbox should be enabled if applying Intraday to a futures chart. VWAP will be anchored to the calendar day rollover by default, which will cause conflict with overnight futures sessions beginning at 18:00 EST if this option is not enabled.

Futures Session Start

If Futures Session is checked, this input allows you to control the initial anchor point of the plotted VWAP. Set to 18:00 by default, which we recommend for futures.

Futures Session End

If Futures Session is checked, this input allows you to control the endpoint of the plotted VWAP. Set to 17:00 by default, which we recommend for futures.

Data Series

Your “Input series” should always be set to the symbol being traded with your selected timeframe in parenthesis — e.g., “SPY (2 minute)”. If you see something different, it’s the likely cause of any issues you may be experiencing.

If needed, simpy remove the indicator from your chart and close it, open up a fresh chart, and attempt to re-add the indicator with the correct data series.

Remaining Settings

The remaining settings in the “Setup” and “Visual” tabs should not be adjusted in order to avoid potential errors. The options listed in the “Plots” tab can be used to adjust the thickness and display style of VWAP, the deviation bands, and the tolerance bands.

Saving Templates

In the bottom-right corner of the settings window, you’ll see a link labeled “template” — just above the “Apply” button. If you choose to make any changes to Intraday’s default settings, you can click that link and then click “save”.

This gives you the ability to create multiple presets for the same indicator, allowing you to quickly load your ideal settings on a new chart. You’re also able to “Save as Default”, which will override the indicator’s initial defaults and load your preferred setting automatically when Intraday is added to a new chart.

Import Instructions

Step 1 – Download the code by clicking here. It will appear in your downloads as a zip folder titled “THE_VWAP_INTRADAY_DLL”. Do NOT extract folder — it will need be imported as-is in order to work properly. Move it to your preferred storage location on your PC.

NinjaTrader 8 Import Screenshot 1

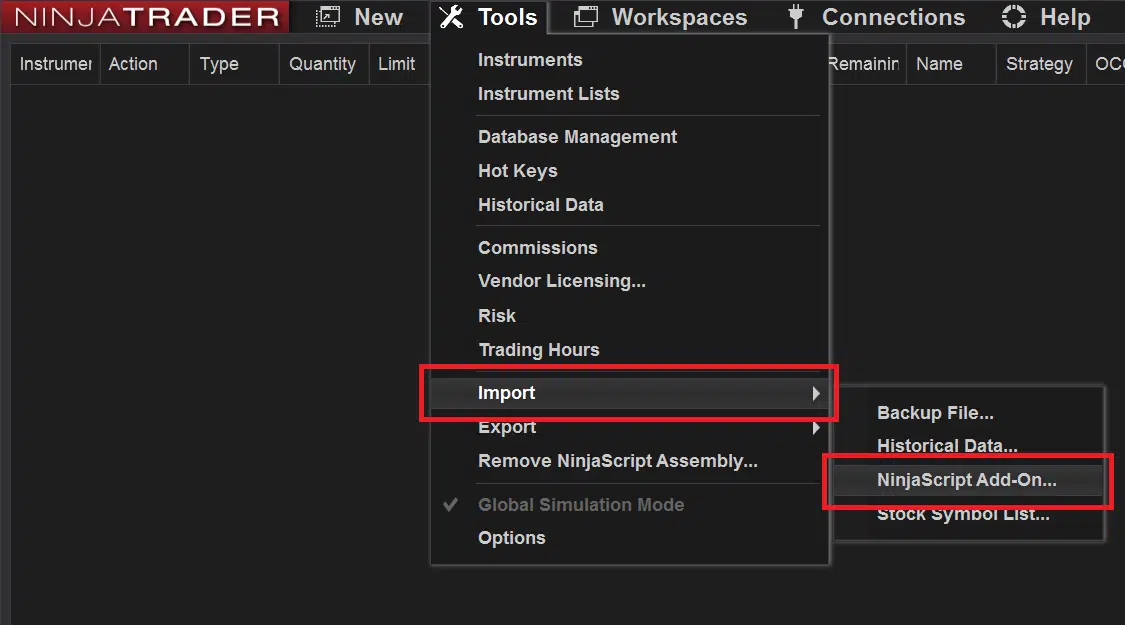
Step 2 – To import the indicator, open your NinjaTrader 8 platform and select “Tools” from the main menu at the top of the application. Mouse over “Import” and select “NinjaScript Add-On”.

NinjaTrader 8 Import Screenshot 2

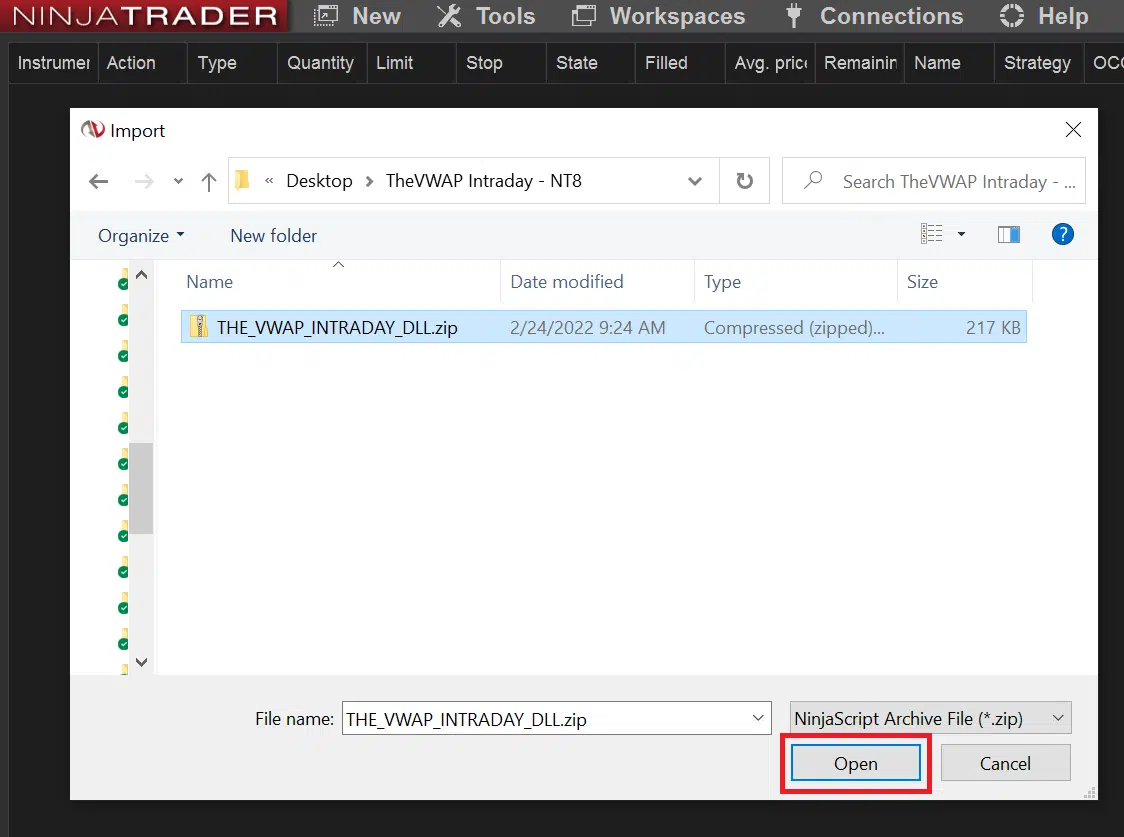
Step 3 – Navigate to the stored zip folder, click to select it, and then click “Open”. You may receive a popup warning about 3rd-party indicators that you can click through, and soon after you’ll receive another popup confirming that all scripts have been successfully imported.

NinjaTrader 8 Import Screenshot 3

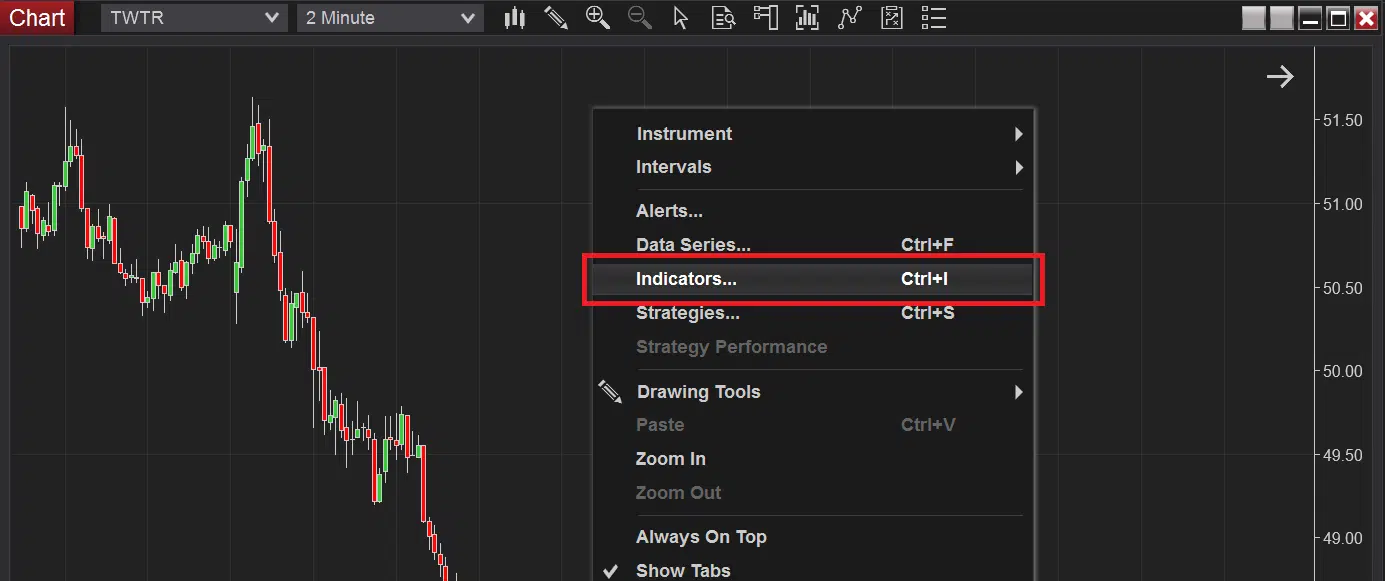
Step 4 – Open a chart, right-click within the window, and select “Indicators”. Navigate through the “Available” list to locate the indicator, select it, and then click “add” to place it in the “Configured” list. Then “OK” to close the indicators window.

NinjaTrader 8 Import Screenshot 4

Step 5 – You should now see the indicator successfully added to your chart. Please be sure to read through the tutorial above to get familiar with all of its settings.

NinjaTrader 8 Import Screenshot 5