Intraday for TradeStation 10

TS Logo 2

Download the indicator and read through the tutorial provided below.

Indicator Tutorial

Click on the options below to read more about Intraday’s settings on TS.

Import Instructions

The folder you will download above needs to be extracted/unzipped before importing to TradeStation 10 in order to avoid any issues.

If necessary, you can click here to find step-by-step import instructions for the indicator.

The Use of Hints

You’ll see multiple fields within the settings that include “Hint” at the end of the provided label. These fields should NOT be altered by typing, and are meant to correspond to the available setting found below each one.

In the absence of dropdown menus, these hints outline the available options for several of Intraday’s inputs. To select one of the options, you would type the corresponding number in the input field below each hint. We’ll explain in more detail below.

StDev 1 & St Dev2

Set to 1 and 2 by default, these inputs control the values of the plotted standard deviation bands on either side of VWAP. If both are set to 0, no deviation bands will be displayed.

timeFrame Hint & timeFrame

Select your desired timeframe for the plotted VWAP. Only the field labeled “timeFrame” should be altered. Here are the available options specified in the “timeFrame_Hint” field:

1. DAY (default) — The option you’ll likely use most frequently. A standard intraday VWAP that resets at the beginning of each new trading session.

2. WEEK — Plots week-to-date VWAPs, using the first trading day of each week (or the leftmost point on the visible chart) as an anchor point.

3. MONTH — Plots month-to-date VWAPs, using the first trading day of each month (or the leftmost point on the visible chart) as an anchor point.

VWAP Color Hint & VWAP Color

Change the display color for the plotted VWAP. Only the field labeled “VWAP_Color” should be altered. Here are the available options specified in the “VWAP_Color_Hint” field:

1. SlopeBasic (default) — The color of VWAP will change dynamically based on the current slope of VWAP — one color for when ascending and one for when descending.

2. SlopeSignal — Similar to SlopeBasic, but a third color is added for periods of “neutral” slope. If selected, the display colors are hard-coded .

3. Single — The color of VWAP will remain consistent regardless of the current slope value.

VWAP Single Color

If VWAP Color is set to Single, this option controls the color of VWAP.

VWAP Bands1 Color

This option controls the color of the +1 and -1 deviation bands.

VWAP Bands2 Color

This option controls the color of the +2 and -2 deviation bands.

Background Color Signal Hint & Background Color Signal

This setting controls the visual display of the clouds above/below VWAP. Only the field labeled “Background_Color_Signal” should be altered. Here are the available options specified in the “Background_Color_Signal_Hint” field:

0. None — Turns off all cloud displays.

1. Cloud (default) — Displays clouds of two different colors — one for above VWAP and one for below.

2. Fast Lane — Displays clouds only in the space between the +/-1 and +/-2 deviation bands.

3. Both — Combines the two options above, displaying four different colors.

TradeStation does not allow for “actual” cloud coloring, so these clouds are created using histograms that fill the distance between each candle and the particular lower/upper boundary. Please not that if you widen your chart while using higher timeframes, the clouds may appear broken — this is normal.

Cloud Transparency

If clouds are enabled using Background Color Signal, this input controls the opacity of their display. The closer to 0 you set it, the less visible the clouds will appear.

Show Dev Signal

This checkbox corresponds to a calculate slope value threshold and will highlight certain periods with coloring of the +/- 2 deviation bands. We discuss its use in VWAP On-Demand.

Tolerance Band Width

Plots additional bands surrounding the +/-1 deviation bands at a user-determined distance (expressed in deviations). We discuss their use in VWAP On-Demand.

High or Low of X Bars

Use of this option is discussed in VWAP On-Demand, and can/should be left set to 0 if not familiar with its purpose.

Futures Session

This should be set to “true” if applying Intraday to a futures chart. VWAP will be anchored to the calendar day rollover by default, which will cause conflict with overnight futures sessions beginning at 18:00 EST if this option is not enabled.

Futures Session Start

If Futures Session is set to “true”, this input allows you to control the initial anchor point of the plotted VWAP. Set to 18:00 by default, which we recommend for futures.

Futures Session End

If Futures Session is set to “true”, this input allows you to control the endpoint of the plotted VWAP. Set to 17:00 by default, which we recommend for futures.

Style Tab

The Style tab allows you to change the display style and weight of each plot — VWAP, standard deviation bands, and the tolerance bands.

Import Instructions

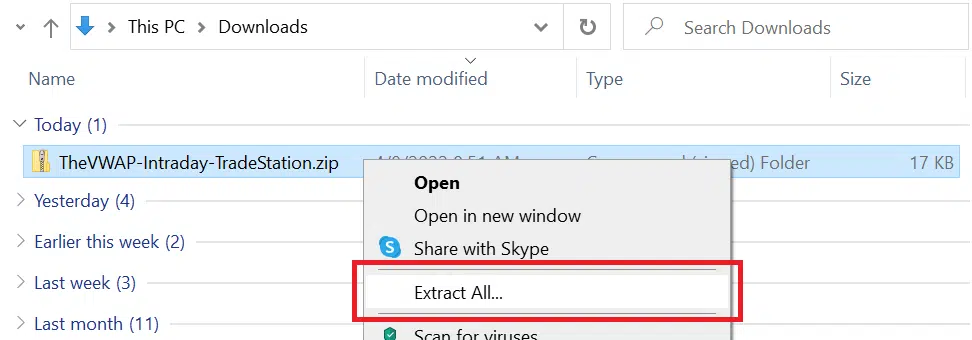
Step 1 – Download the code by clicking above. The download will appear as a zipped folder titled “TheVWAP-Intraday-TradeStation”. Open your Downloads, right-click the folder and select “Extract All”. Click “Browse”, choose your desired destination, and then click “Extract”.

custom-VWAP-indicators-tradestation-1

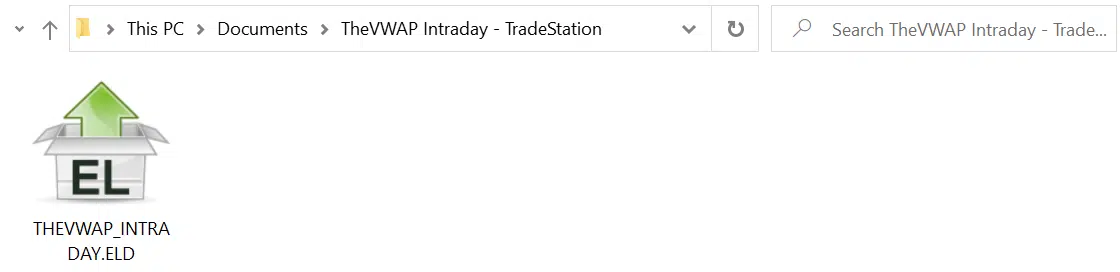
Step 2 – Your unzipped folder will contain one .ELD code file. If your TradeStation platform isn’t already open, you can double-click the file to open TS.

custom-VWAP-indicators-tradestation-2

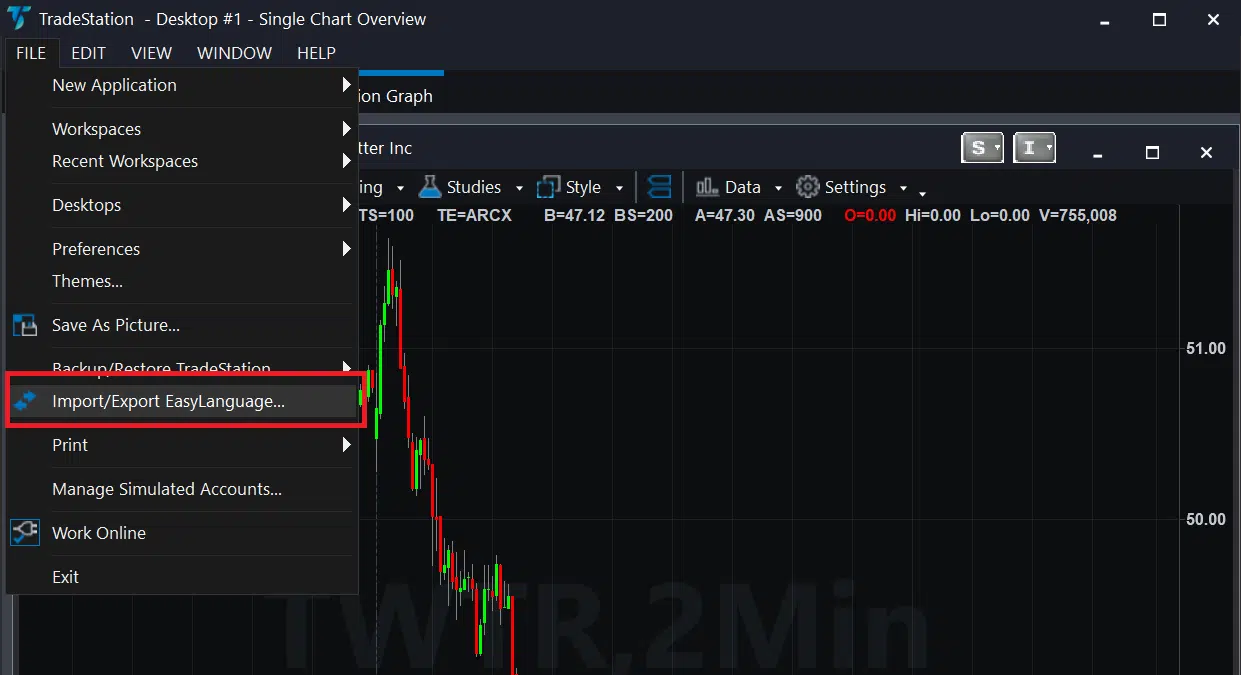
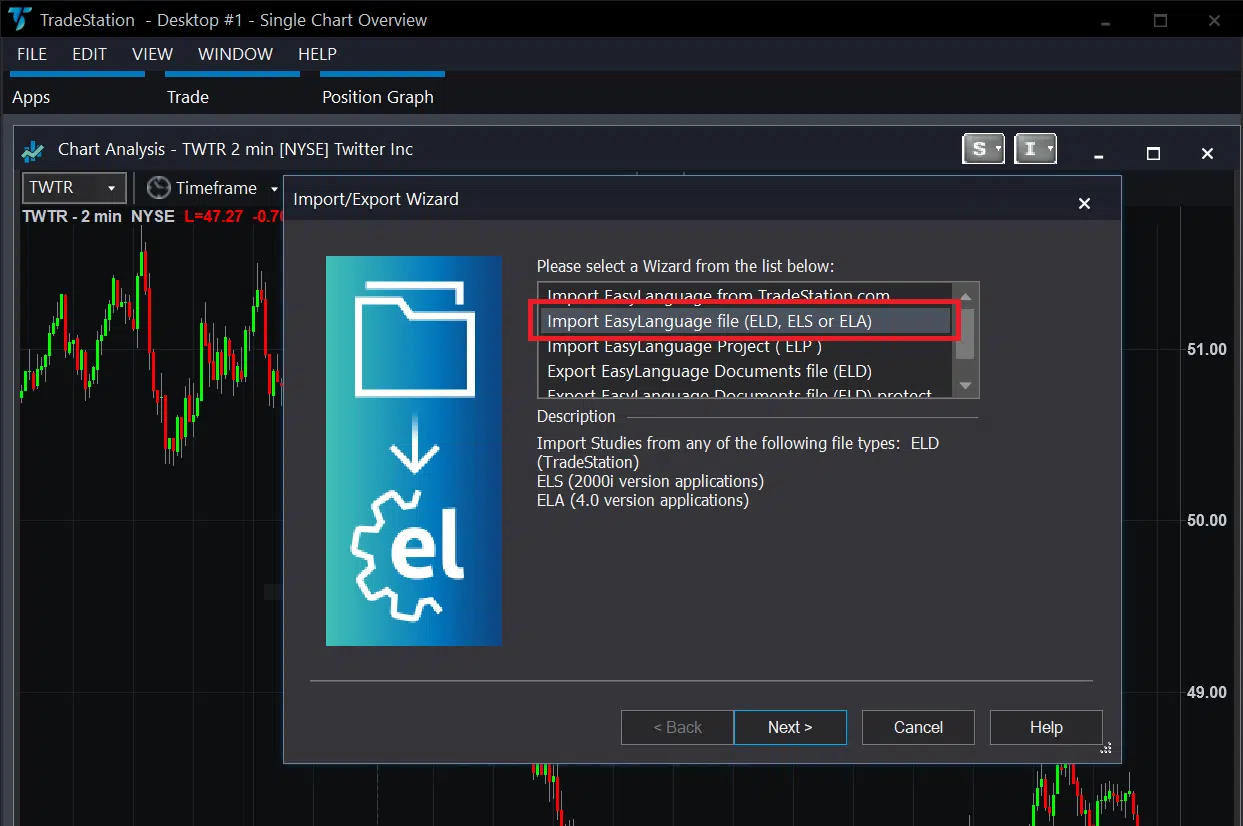
Step 3 – With your TradeStation platform (version 10.0) now open, click “FILE” and then “Import/Export EasyLanguage…” from the top navigation bar.

custom-VWAP-indicators-tradestation-3

Step 4 – Within the Import/Export Wizard window, click “Import EasyLanguage file (ELD, ELS or ELA)” and then click “Next”.

custom-VWAP-indicators-tradestation-4

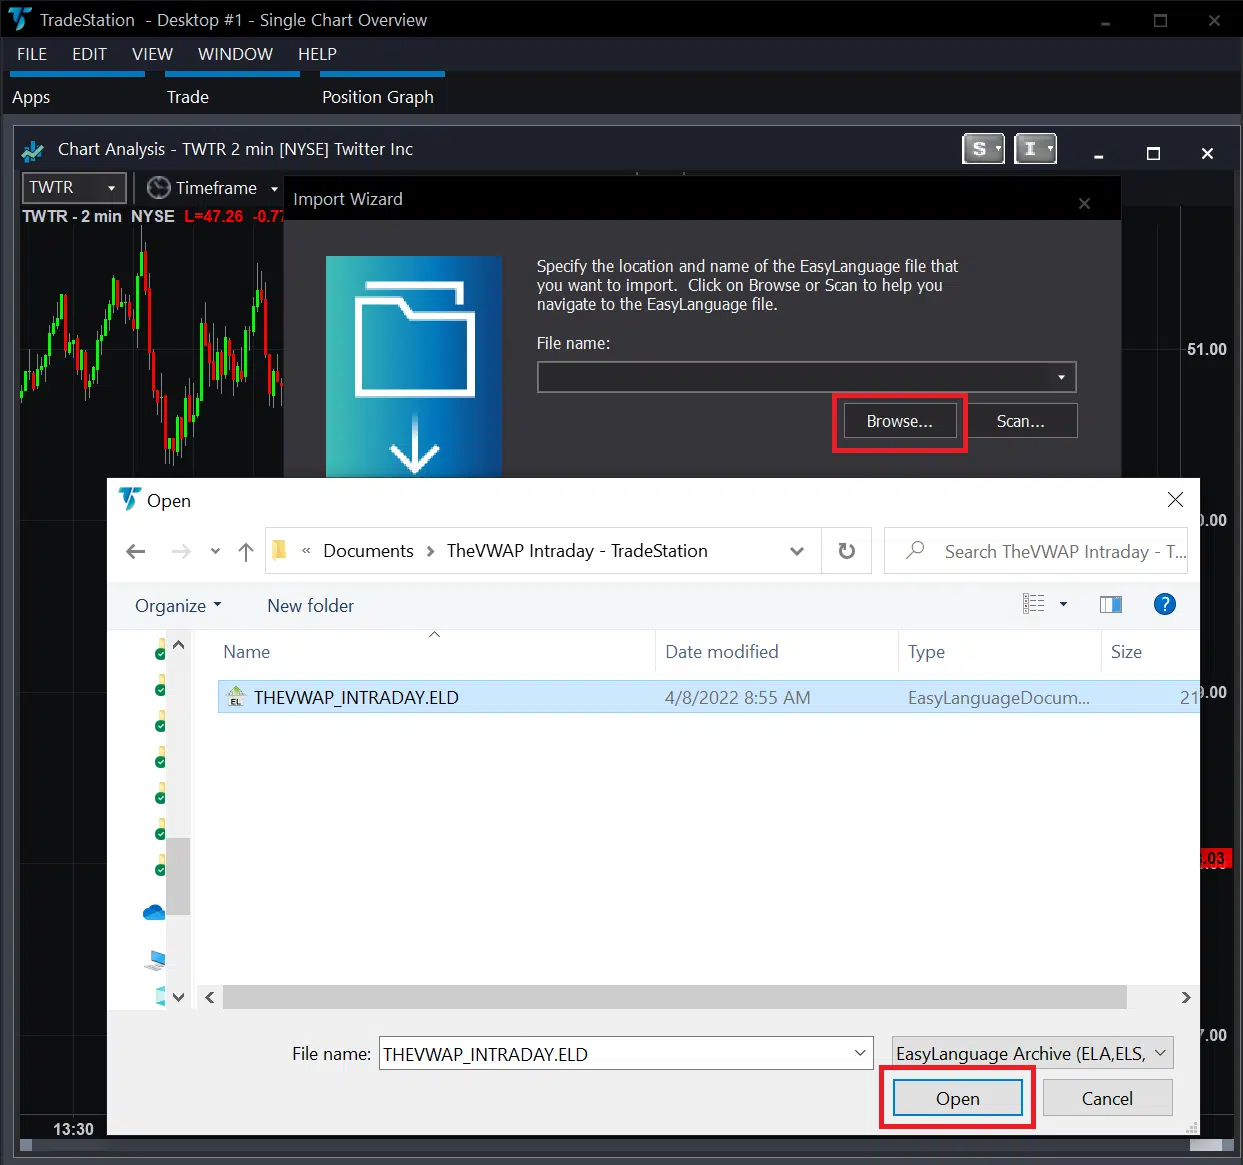
Step 5 – Click “Browse” within the Import Wizard, which will open a file search box on your computer. Locate the folder you extracted in Step 1, select the file, and click “Open”.

custom-VWAP-indicators-tradestation-5

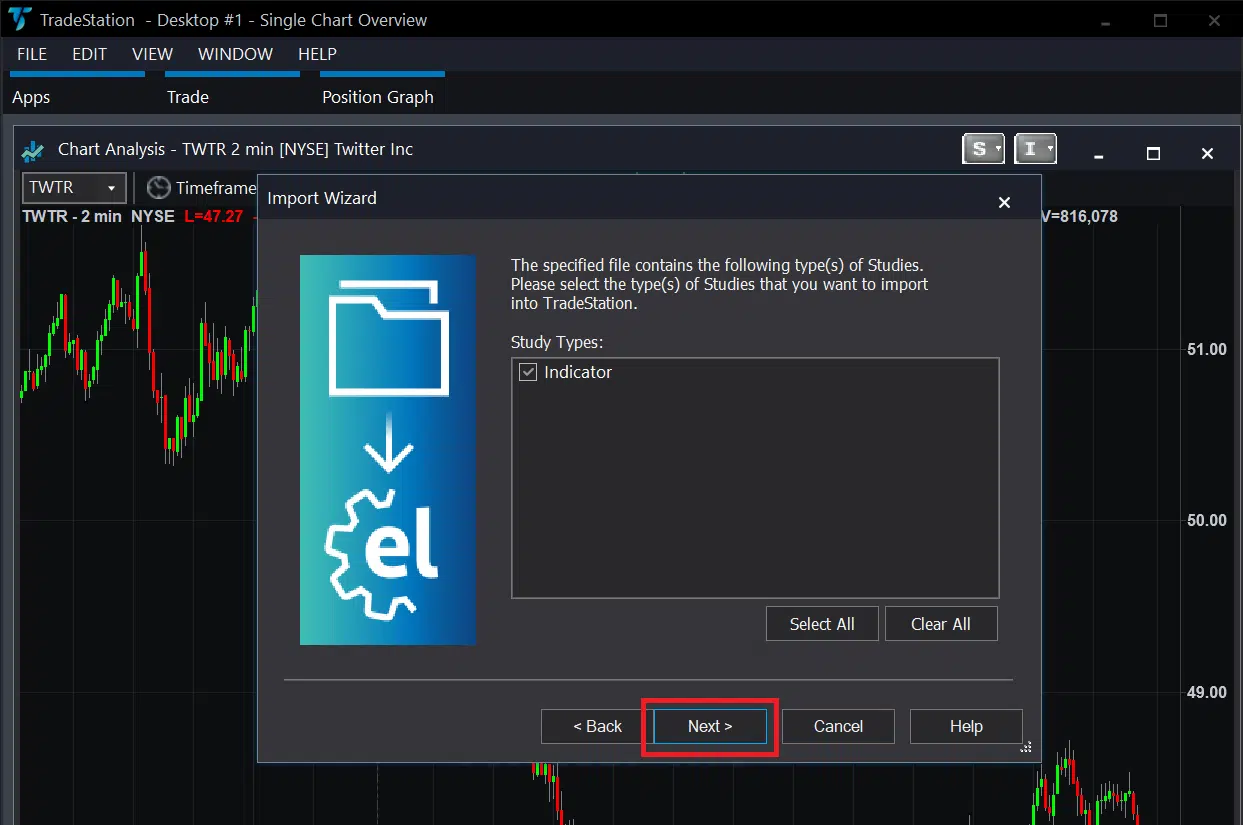
Step 6 – Continue clicking “Next” to progress through the importing of all study types, functions, and other prompts that may be associated with the particular indicator you’re importing. Do not uncheck any of the options that are listed by default, as it may result in a corrupted import.

custom-VWAP-indicators-tradestation-6

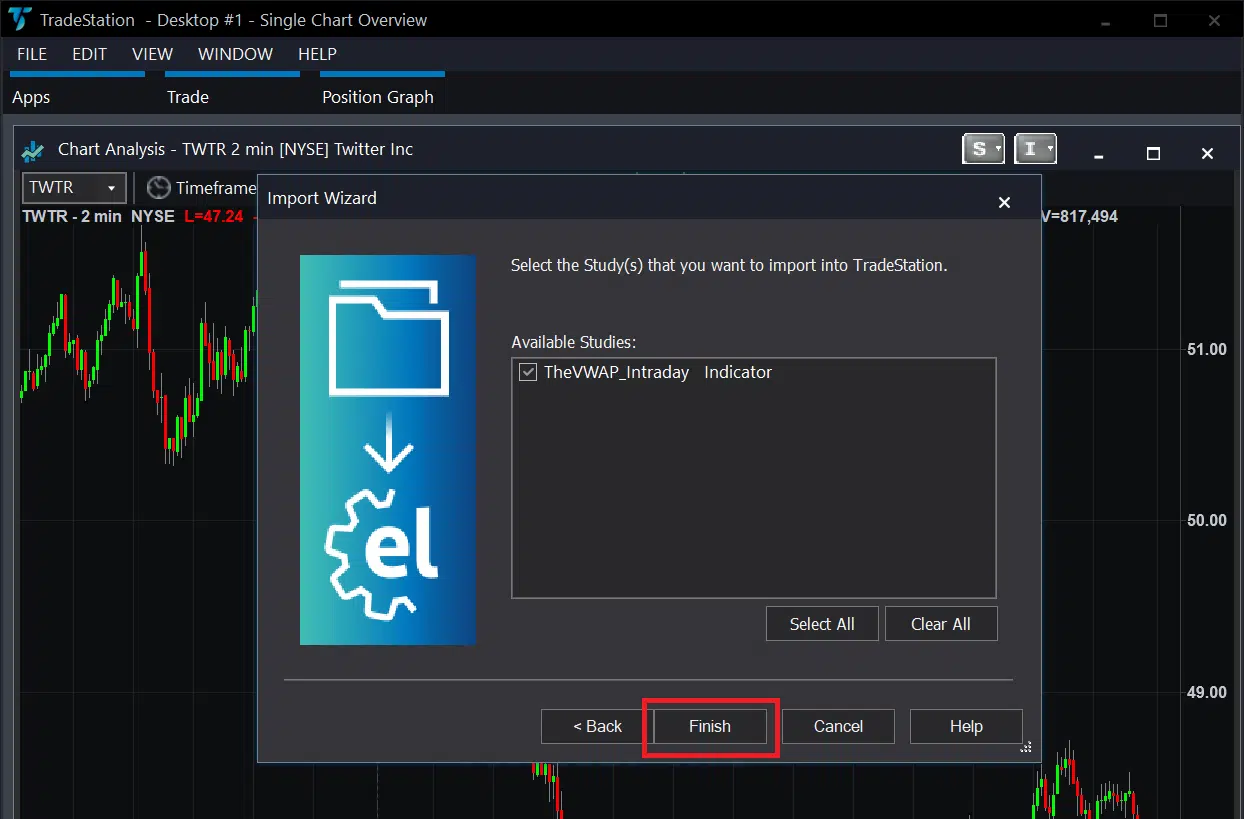
Step 7 – You’ll eventually arrive at the final stage of the import process, and the “Next” button will now say “Finish”. Click “Finish”, and you should see a popup confirming that the import is successful.

custom-VWAP-indicators-tradestation-7

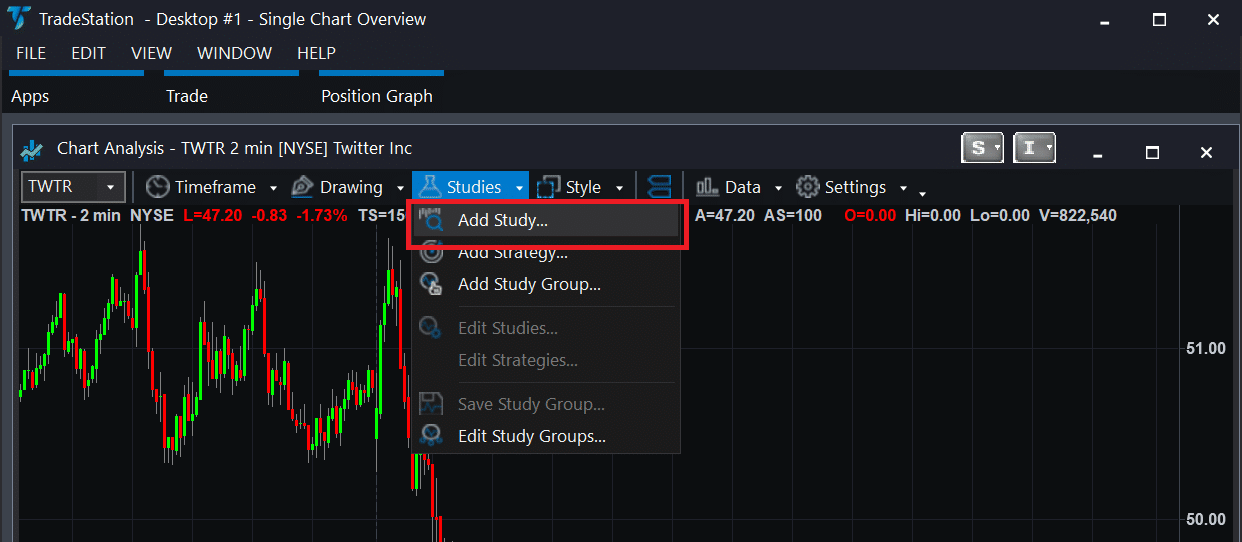
Step 8 – Next, open any chart and click “Studies” and then “Add Study”. You’ll see a full list of the available TS indicators in alphabetical order. Scroll down to “T” and you’ll see our indicator labeled with the prefix “TheVWAP”. Select the indicator and click “OK”.

custom-VWAP-indicators-tradestation-8